Skip to content

Hardware Interfaces

The hardware interfaces provide an interface between the components (sensors and actuators) of the 2WD robot and its processing units, the Raspberry Pi 4 B (or the Nvidia Jetson Nano) and the microcontroller (in this case the Teensy 4.0).

USB

The Universial Serial Bus (USB) connections are required to connect the Single Board Computer (SBC) with the microcontroller. Using this connection, it is possible to communicate via rosserial.

Another USB connector is used for the RPLidar laser scanner.

Info

See the section USB Devices below to setup the required permissions and allow the communication between this interface.

Single Board Computer GPIO

Currently, one GPIO pin is used to connect the ultrasonic ranger.

The ultrasonic ranger uses just a single GPIO pin for communicating its measured distances. Therefore, we can use one of the GPIO pins such as physical pin 11.

Info

In case you are using LM393 speed sensors, instead of the encoders of the DG01D-E, the LM393 use a single digital GPIO pin each. These pins could be directly connected to the Raspberry Pi GPIOs and setup using software interrupts with the RPi.GPIO library. Alternatively they could be also connected to the pins of the microcontroller, e.g. Teensy. For this build the

Microcontroller Digital Pins

Four digital pins on the Teensy microcontroller are in use for the two quadrature encoders of the DG01D-E.

Info

See the diffbot_base package for the running software script to read the encoder ticks.

Single Board Computer I2C Connection

The I2C connections on the Raspberry Pi 4 B are used for multiple components such as the motor driver and the oled display.

I2C Pinout on Raspberry Pi 4 B.

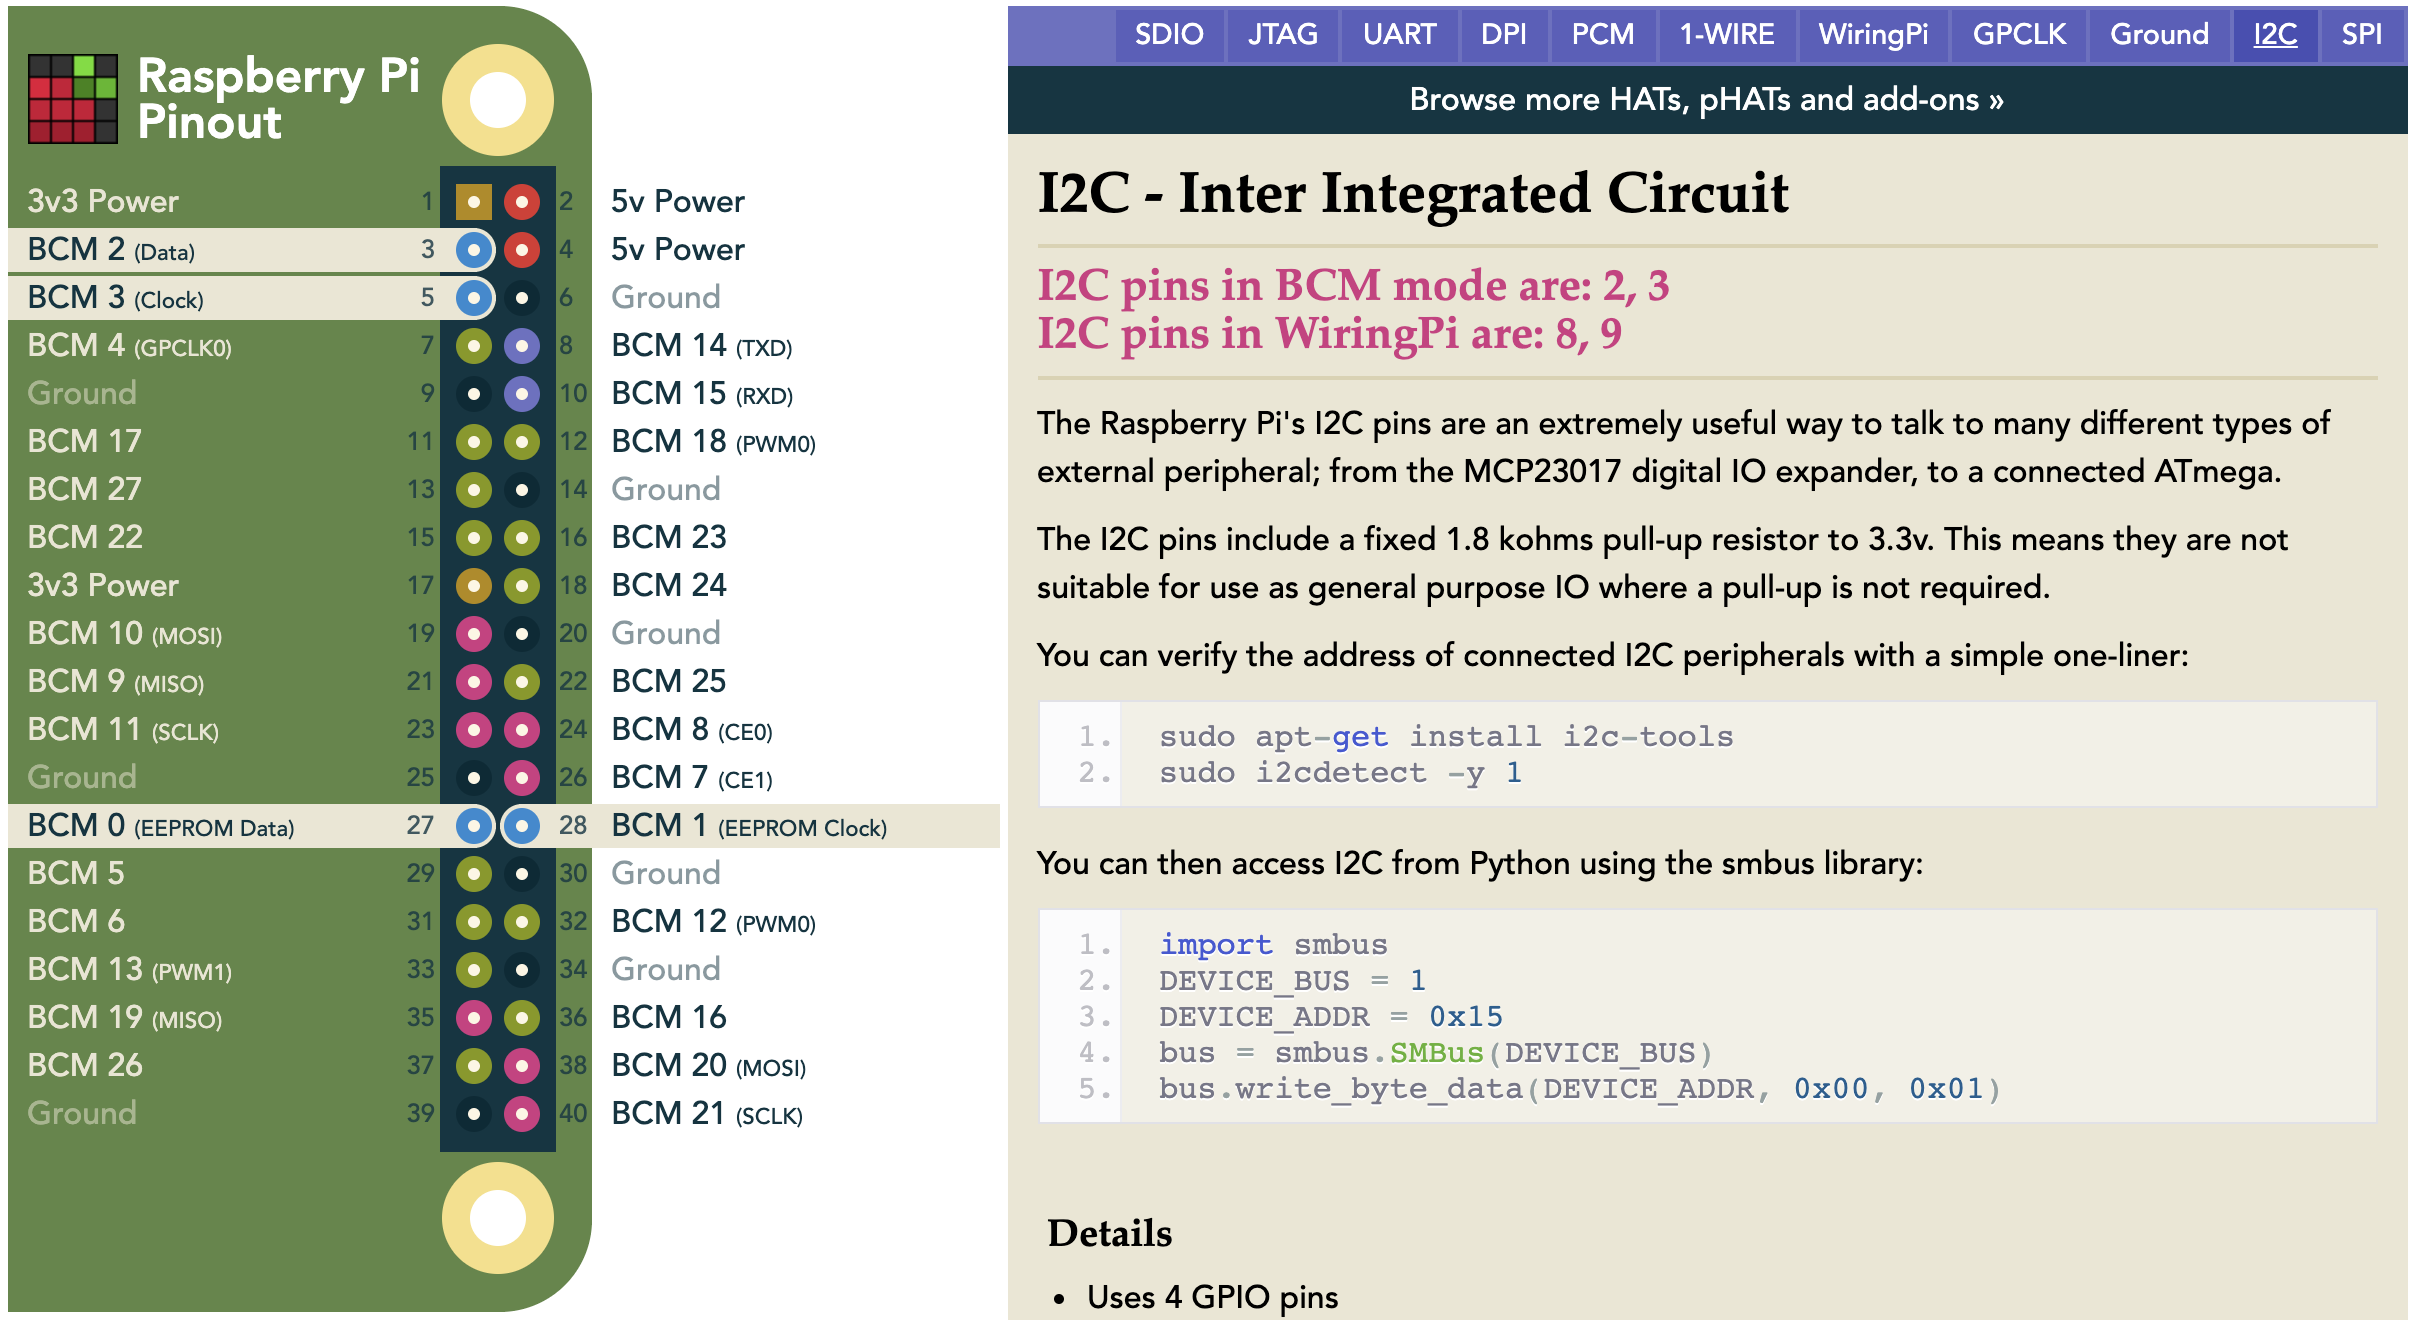
Using these ports on the Raspberry Pi 4 B, requires that we enable the I2C interface.

To do so, we will use the tool i2cdetect which requires that we install a tool on Ubuntu called i2c-tools:

1
2
3
4
5
6
7
fjp@remo:~$ i2cdetect

Command 'i2cdetect' not found, but can be installed with:

sudo apt install i2c-tools

fjp@remo:~$ sudo apt install i2c-tools

This i2cdetect tool is a userspace program to scan an I2C bus for devices given a specific i2cbus argument which indicates the number or name of the I2C bus to be scanned, and should correspond to one of the busses listed by i2cdetect -l. See also info i2cdetect for the manual page.

To test if the i2c ports are working we use the following commands:

1
2
3
4
$ i2cdetect -y 0
Error: Could not open file '/dev/i2c-0' or '/dev/i2c/0': No such file or directory
$ i2cdetect -y 1
Error: Could not open file '/dev/i2c-1' or '/dev/i2c/1': No such file or directory

The ports are not setup correctly yet, which is why we need to enable the following two lines in the /boot/firmware/config.txt file:

1
2
dtparam=i2c0=on
dtparam=i2c1=on

After rebooting the Raspberry Pi and entering the command again the following output will appear:

1
2
3
$ i2cdetect -y 0
Error: Could not open file `/dev/i2c-0': Permission denied
Run as root?

Running as root using sudo will work (please read on, there is a better way):

 1
 2
 3
 4
 5
 6
 7
 8
 9
10
11
$ sudo i2cdetect -y 0
[sudo] password for fjp:
     0  1  2  3  4  5  6  7  8  9  a  b  c  d  e  f
00:          -- -- -- -- -- -- -- -- -- -- -- -- -- 
10: -- -- -- -- -- -- -- -- -- -- -- -- -- -- -- -- 
20: -- -- -- -- -- -- -- -- -- -- -- -- -- -- -- -- 
30: -- -- -- -- -- -- -- -- -- -- -- -- -- -- -- -- 
40: -- -- -- -- -- -- -- -- -- -- -- -- -- -- -- -- 
50: -- -- -- -- -- -- -- -- -- -- -- -- -- -- -- -- 
60: -- -- -- -- -- -- -- -- -- -- -- -- -- -- -- -- 
70: -- -- -- -- -- -- -- --

As mentioned there is a better way to access the i2c devices without using power user privileges. When issuing the following:

1
2
ls -l /dev/i2c-0 
crw-rw---- 1 root i2c 89, 0 Apr  1  2020 /dev/i2c-0

we see that the /dev/i2c-0 device belongs to user root and i2c user group. To get access without sudo we can add other users, requiering access to the i2c group with:

1
2
3
4
sudo adduser fjp i2c
Adding user `fjp' to group `i2c' ...
Adding user fjp to group i2c
Done.

After logging out and back in again the access will be granted and following output will come up:

 1
 2
 3
 4
 5
 6
 7
 8
 9
10
$ i2cdetect -y 0
     0  1  2  3  4  5  6  7  8  9  a  b  c  d  e  f
00:          -- -- -- -- -- -- -- -- -- -- -- -- -- 
10: -- -- -- -- -- -- -- -- -- -- -- -- -- -- -- -- 
20: -- -- -- -- -- -- -- -- -- -- -- -- -- -- -- -- 
30: -- -- -- -- -- -- -- -- -- -- -- -- -- -- -- -- 
40: -- -- -- -- -- -- -- -- -- -- -- -- -- -- -- -- 
50: -- -- -- -- -- -- -- -- -- -- -- -- -- -- -- -- 
60: -- -- -- -- -- -- -- -- -- -- -- -- -- -- -- -- 
70: -- -- -- -- -- -- -- -- 

It outputs a table with the list of detected devices on the specified bus. In this case there are no connected devices on I2C bus 0.

Alternative setup using raspi-config On Raspian Buster, the official Raspberry OS, we could use the `raspi-config` tool:
fjp@ubuntu:~/git/2wd-robot$ sudo raspi-config
Raspberry Pi 4 Model B Rev 1.1


┌──────────────────┤ Raspberry Pi Software Configuration Tool (raspi-config) ├───────────────────┐
│                                                                                                │
│      1 Change User Password Change password for the current user                               │
│      2 Network Options      Configure network settings                                         │
│      3 Boot Options         Configure options for start-up                                     │
│      4 Localisation Options Set up language and regional settings to match your location       │
5 Interfacing Options  Configure connections to peripherals                        
│      6 Overclock            Configure overclocking for your Pi                                 │
│      7 Advanced Options     Configure advanced settings                                        │
│      8 Update               Update this tool to the latest version                             │
│      9 About raspi-config   Information about this configuration tool                          │
│                                                                                                │
│                                                                                                │
│                                                                                                │
│                           <Select>                           <Finish>                          │
│                                                                                                │
└────────────────────────────────────────────────────────────────────────────────────────────────┘
Select the i2c option:


┌──────────────────┤ Raspberry Pi Software Configuration Tool (raspi-config) ├───────────────────┐
│                                                                                                │
│        P1 Camera      Enable/Disable connection to the Raspberry Pi Camera                     │
│        P2 SSH         Enable/Disable remote command line access to your Pi using SSH           │
│        P3 VNC         Enable/Disable graphical remote access to your Pi using RealVNC          │
│        P4 SPI         Enable/Disable automatic loading of SPI kernel module                    │
P5 I2C         Enable/Disable automatic loading of I2C kernel module            
│        P6 Serial      Enable/Disable shell and kernel messages on the serial connection        │
│        P7 1-Wire      Enable/Disable one-wire interface                                        │
│        P8 Remote GPIO Enable/Disable remote access to GPIO pins                                │
│                                                                                                │
│                                                                                                │
│                                                                                                │
│                                                                                                │
│                           <Select>                           <Back>                            │
│                                                                                                │
└────────────────────────────────────────────────────────────────────────────────────────────────┘


And enable the interface:


                   ┌──────────────────────────────────────────────────────────┐
                   │                                                          │ 
                   │ Would you like the ARM I2C interface to be enabled?      │ 
                   │                                                          │ 
                   │                                                          │ 
                   │                                                          │ 
                   │                                                          │ 
                   │                                                          │ 
                   │                                                          │ 
                   │                                                          │ 
                   │                                                          │ 
                   │                                                          │ 
                   │                                                          │ 
                   │                                                          │ 
                   │                                                          │ 
                   │                                                          │ 
                   │                                                          │ 
                   <Yes>                  <No>                │ 
                   │                                                          │ 
                   └──────────────────────────────────────────────────────────┘ 
                                                                                

Confirm the activation and restart the RPi:


                   ┌──────────────────────────────────────────────────────────┐
                   │                                                          │ 
                   │ The ARM I2C interface is enabled                         │ 
                   │                                                          │ 
                   │                                                          │ 
                   │                                                          │ 
                   │                                                          │ 
                   │                                                          │ 
                   │                                                          │ 
                   │                                                          │ 
                   │                                                          │ 
                   │                                                          │ 
                   │                                                          │ 
                   │                                                          │ 
                   │                                                          │ 
                   │                                                          │ 
                   │                                                          │ 
                   <Ok> 
                   │                                                          │ 
                   └──────────────────────────────────────────────────────────┘ 
                                                                                

USB Devices

Similar to accessing i2c devices, a non root user can use usb connections by adding it to the the dialout group:

1
2
3
4
sudo adduser fjp dialout
Adding user `fjp' to group `dialout' ...
Adding user fjp to group dialout
Done.