How the Dev Container Works
What the files in diffbot's .devcontainer/noetic/ folder do, and how the image, the container, VS Code, the network and the display access are set up. To install and use the dev container, see Development Environment.
| File in diffbot | Purpose |
|---|---|
.devcontainer/noetic/Dockerfile |
The image: ROS, Gazebo, tools and the packages' dependencies |
.devcontainer/noetic/devcontainer.json |
How the container runs: mounts, network, display, what runs when |
.devcontainer/noetic/setup.sh |
Runs once in a new container: fetches repositories, installs dependencies, builds the workspace |
.devcontainer/noetic/host-x11.sh |
Runs on the host before the container starts: prepares the display access |
.dockerignore |
Keeps .git and the X11 cookie out of the image build |
.github/workflows/devcontainer.yml |
CI builds the same container on every pull request |
The image
The Dockerfile starts from osrf/ros:noetic-desktop-full, the official ROS image with ROS Noetic, Gazebo 11 and RViz on Ubuntu 20.04. On top it installs catkin tools, vcstool and a few shell tools, and creates the user ros (UID 1000, sudo without password).
The packages' dependencies are installed with rosdep from their package.xml files. The Dockerfile has two stages for this:
- The first stage copies the repository and keeps only the
package.xmlfiles. - The second stage copies just those files and runs
rosdep installon them.
Docker reuses a build step as long as its inputs don't change (build cache). Because the rosdep step only sees the package.xml files, a change to the source code doesn't reinstall the dependencies: the image rebuilds in about 2 seconds. A change to a package.xml reinstalls them, which takes about 40 seconds.
Why the old Dockerfile was replaced
The repository used to have a Dockerfile in its root. It stopped building because it added the ROS package source a second time, with ROS's old signing key, which expired in 2025 (EXPKEYSIG F42ED6FBAB17C654; see the ROS signing key migration guide). The official ROS images already have the ROS package source set up with the current key, so the new Dockerfile doesn't add it again.
Creating the container
When the container is created, the devcontainer.json settings apply in this order (see the dev container lifecycle scripts):
- On the host:
host-x11.shprepares the display access (see GUI apps below). - Build and start: the image is built, and the container starts with your clone mounted at
~/catkin_ws/src/diffbot. VS Code and the CLI change the UID and GID of the userrosto yours, so files created in the container belong to you on the host (updateRemoteUserUID). - In the container:
setup.shruns once. It importsrplidar_rosandremo_descriptionwithvcs importfromdiffbot_dev.repos, runsrosdep installagain for anything added since the image was built, builds the workspace withcatkin buildand adds the workspace to~/.bashrc.
remo_description contains empty placeholder STL files. To see Remo's meshes in RViz and Gazebo, get the real files as described in its README. DiffBot's own meshes are part of diffbot_description.
VS Code and the container
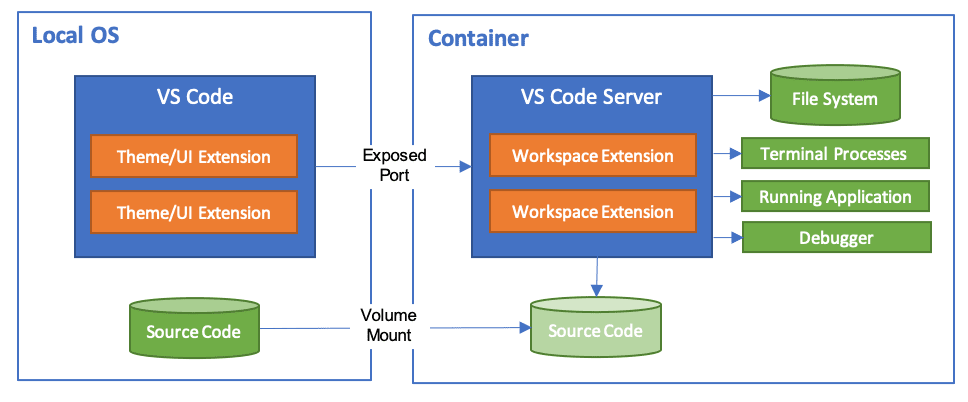
With the Dev Containers extension, VS Code is split in two. Its window, with the editor, the theme and other UI extensions, runs on your PC as a normal program (on Windows, as a Windows program). The extension installs a VS Code Server in the container (Remote Development), and the workspace extensions, the terminals, the build, the running programs and the debugger run there, with full access to ROS and the container's tools. The source code stays on the host and is mounted into the container (see Creating the container above), so your files remain when the container is removed.
Network
The container uses the host's network (--network=host): it has no network of its own, and ROS nodes in the container are reachable at the host's IP address. For the real robot, set ROS_MASTER_URI and ROS_IP as described in ROS Network Setup.
ROS 1 nodes connect to each other directly, in both directions: the machines need "full bi-directional connectivity, on all ports" (ROS NetworkSetup). So the robot must be able to reach your PC too:
- Linux PC: the host's IP address is the PC's address on your network, so this works as usual.
- Windows with WSL 2: by default, WSL 2 has its own private IP address behind network translation (NAT), and devices on your network can't connect to it. WSL's mirrored networking changes that, see Work machine on Windows (WSL 2). This isn't tested with the robot yet.
GUI apps: X11 and WSLg
The container has no screen of its own; it's "headless". Linux GUI apps don't need one: a program like RViz is an X client: it connects to an X server and sends it what to draw, and the X server shows the window (X Window System). The container borrows the host's X server. It gets the socket folder /tmp/.X11-unix, through which clients reach the X server, and the DISPLAY variable, which says which display to use. So RViz runs in the container, but its window opens on your desktop like any other.
On Windows, WSLg provides the X server and accepts local clients without a cookie, so nothing else is needed.
How WSLg shows Linux windows on Windows
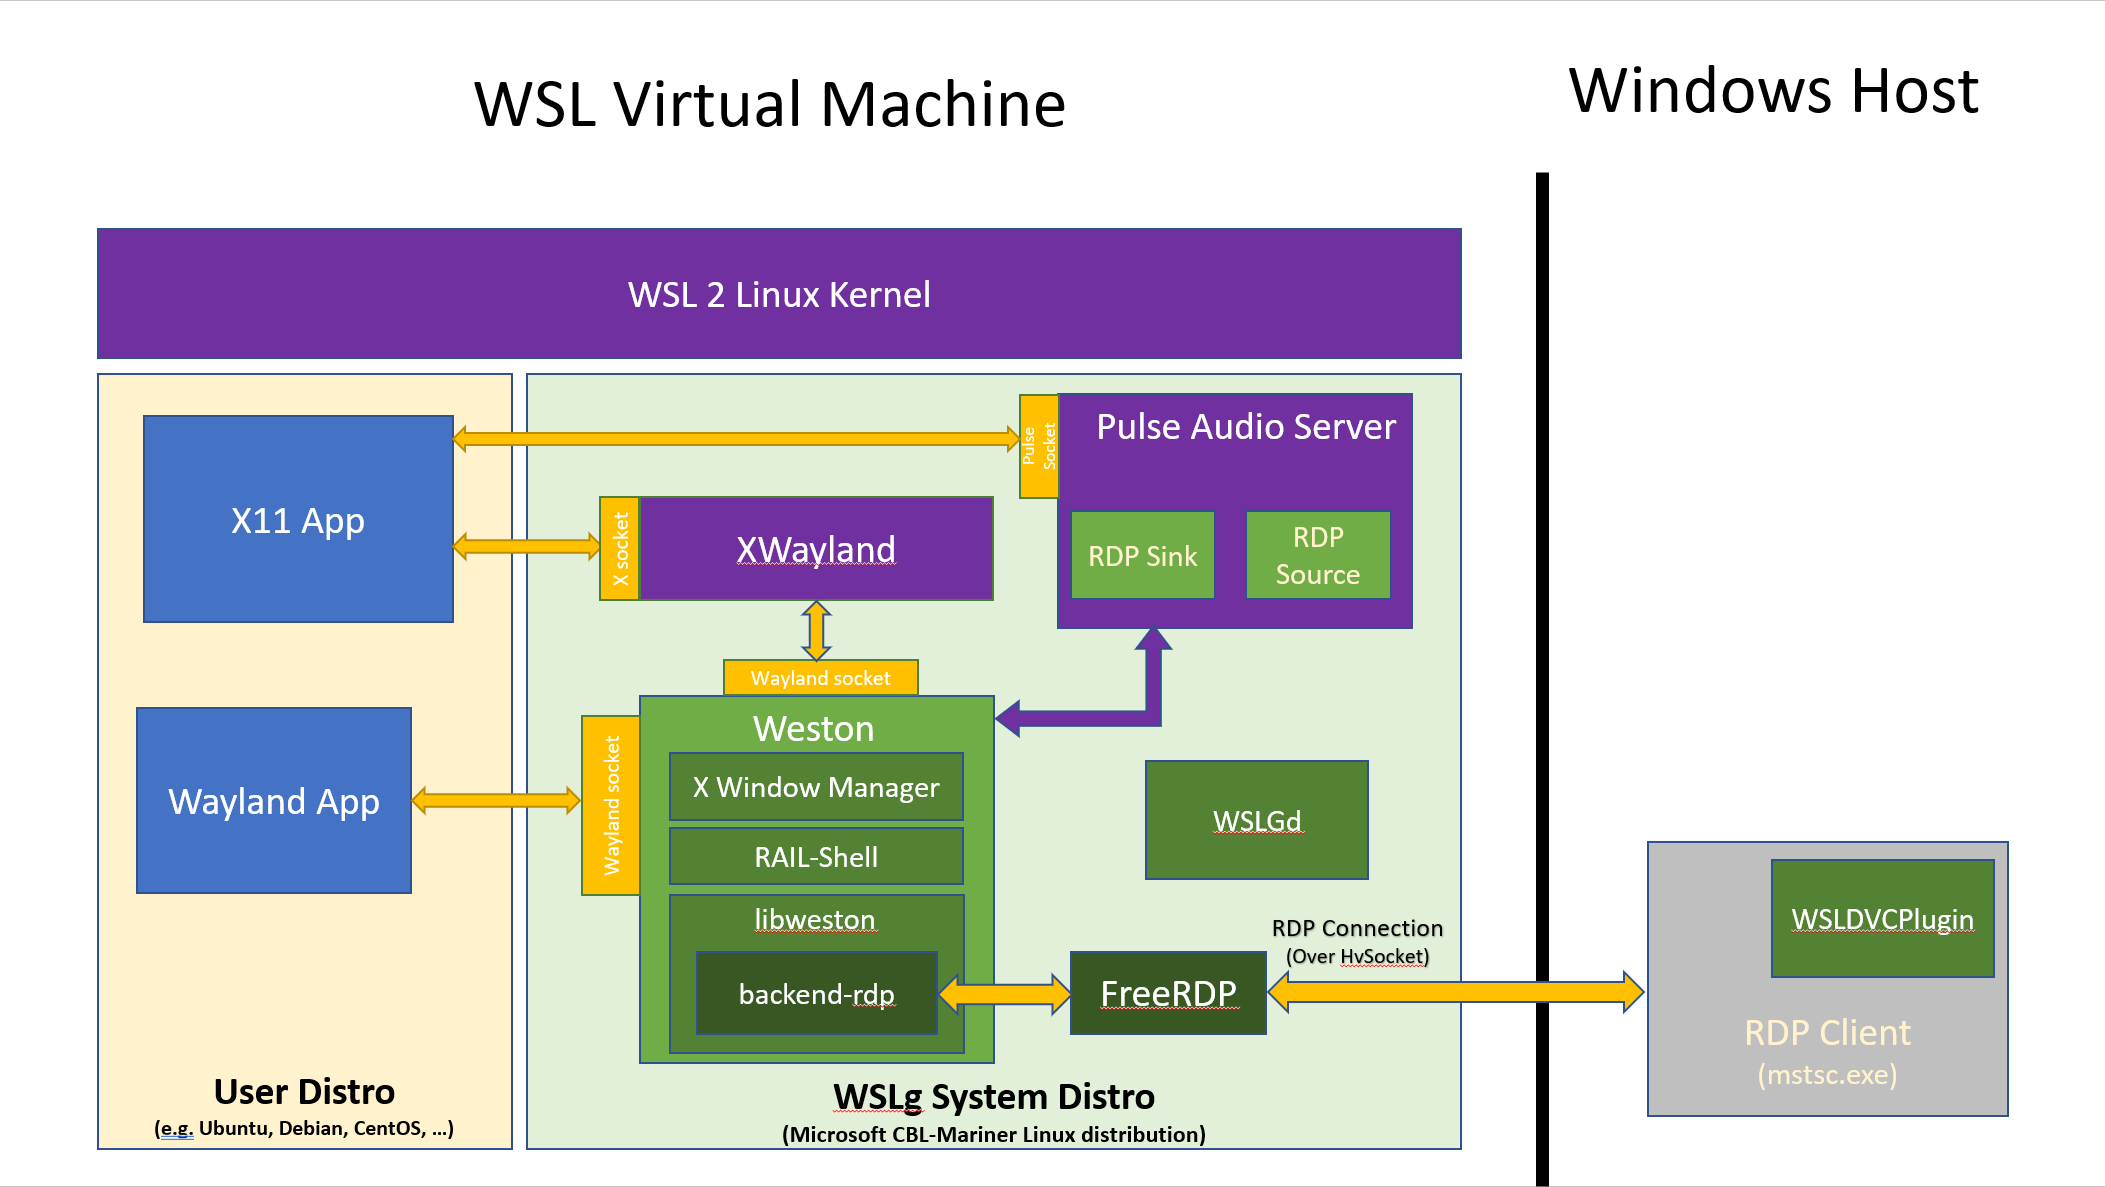
An X11 program like RViz connects through the X socket to XWayland, WSLg's X server. Weston, a Wayland compositor, collects the windows and sends them over a remote desktop (RDP) connection to Windows, which shows each one as a normal window. All of this runs in a small "system distro" next to your Ubuntu.
A native Linux desktop (X11, or Wayland with Xwayland) usually uses cookie-based access control: it only accepts clients that present the display's cookie (MIT-MAGIC-COOKIE-1, see Requirements). host-x11.sh copies that cookie for the container, the method from the ROS Docker GUI tutorial:
1 | |
- Wildcard address:
xauth nlistprints the cookie entries for the display. Their first four characters are the address family;ffffchanges it to "wild", so the cookie matches any hostname, including the container's. - Where the cookie goes: the script writes the cookie to
.devcontainer/noetic/.x11/xauth, through a temporary file and a rename. Git and Docker ignore that folder. - How the container finds it: the container reads the cookie through the workspace mount (
XAUTHORITYpoints there). A refreshed cookie is therefore visible in a running container too.
This avoids xhost +, which switches off the access control, so every local user and process could connect to your display. The ROS tutorial also calls that "not the safest way".
Comments
Comments are GitHub Discussions, shown with giscus. Loading them connects to giscus.app (hosted by Vercel, USA) and GitHub (USA); you need a GitHub account to comment.